How to take a picture of the Milky Way
During my workshops, I get this question over and over:
"Toni, can you teach me how to take a picture of the Milky Way?"
Actually, learning how to photograph the Milky Way is not difficult at all.
It only takes a bit of planning, with the PhotoPills app of course...
And some precision during the shooting as I'll explain to you later on.
"That's really cool Toni, but what settings should I use to photograph the Milky Way?"
The settings you should use to capture the Milky Way are:
- Aperture between f/1.4 and f/2.8, or the largest aperture you can.
- Maximum shutter speed between 8-20s, but calculate it with the PhotoPills Spot Stars calculator.
- ISO between 1600 and 6400, depending on how much noise your camera produces.
Follow the steps I detail in this guide and you’ll learn how to take a picture of the Milky Way!
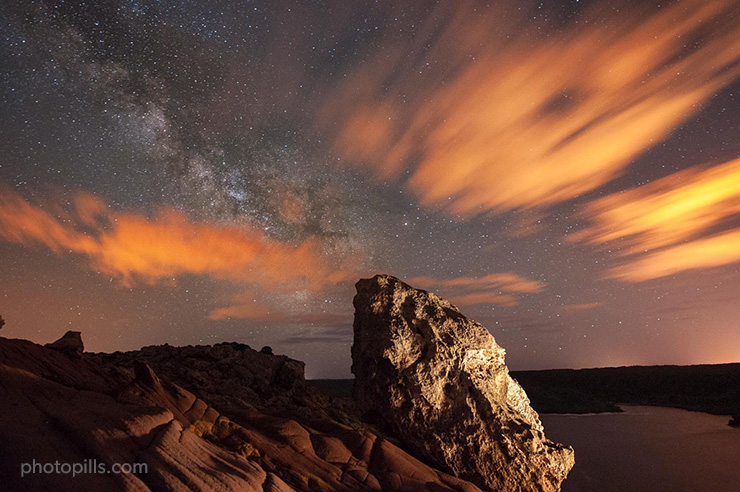
Photos like the one above these lines, where Javier Martínez captured the Milky Way and an ash cloud from the volcano of La Palma over the sea of clouds in the Caldera de Taburiente, Spain.
And if you want to dive deeper into Milky Way photography, have a look at our super detailed Milky Way photography guide where you'll find everything you need to know.
You can download it for free below!
"Keep your eyes on the stars, and your feet on the ground." - Theodore Roosevelt
Get this ebook for free now!
Content
- Get inspiration with these 3 amazing pictures of the Milky Way
- Plan your Milky Way photo ideas
- Choose the best lens for shooting the Milky Way
- Choose the best camera for Milky Way photography
- Get to your shooting spot in advance
- Place the tripod at the shooting spot
- Prepare your gear
- Set the shooting mode to Manual (M)
- Set the shortest focal length you can (<35mm)
- Set the largest aperture you can
- Focus at the hyperfocal distance
- Frame using the highest ISO available in your camera
- Adjust the shutter speed using the NPF rule
- Fine tune the ISO
- Set the white balance to 3900K
- Take a test shot, check the histogram
- Look up at the stars!
1.Get inspiration with these 3 amazing pictures of the Milky Way
When it comes to photographing the Milky Way with a landscape, there are a few things that you should take into consideration.
The first step is to think about what kind of picture you want to shoot. And the second one is where you intend or want to be. So you can plan the photo afterwards...
It can be a diagonal Milky Way.
Or you can be in the Southern Hemisphere, for example.
The thing is, depending on the position of the Milky Way you want and where you'll be, you'll be shooting at different moments in time throughout the year.
So the possibilities are endless!
Here are a few examples to inspire you...
Diagonal Milky Way with a subject (1)

Photo by Pinaki Bhattacharyya
The majority of compositions include the Milky Way as a diagonal in the sky, as seen above.
In the Northern Hemisphere, as we move into June and July, the Milky Way climbs higher and shifts from horizontal to diagonal, making these months the prime time for capturing diverse compositions of our galaxy.
In the Southern Hemisphere,
- From February to March, the Milky Way appears diagonal, with the Galactic Core near the horizon.
- By April and May, it begins diagonally early at night but ascends higher as the night progresses, moving the Galactic Center to mid-sky, offering unique photographic opportunities.
- From June to August, the Milky Way is diagonal at the beginning of the night, vertical during the middle of the night, and low above the horizon at the end of the night.
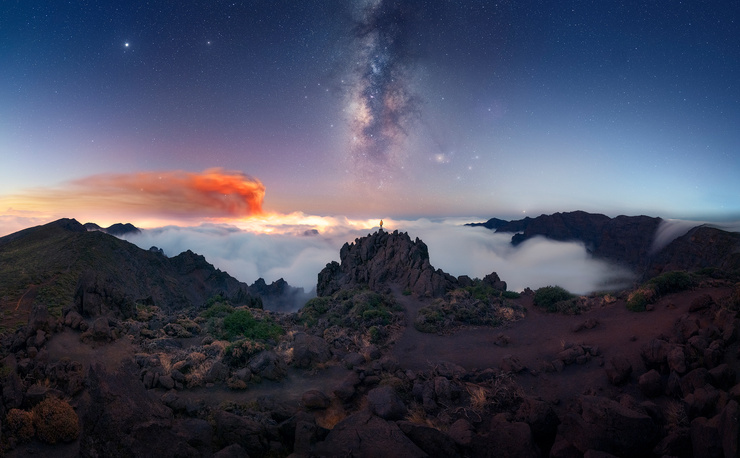
Vertical Milky Way with a subject (2)

Photo by Mauro Cirigliano
A completely vertical Milky Way is an incredible sight. It's like a giant, shiny staircase to heaven!
The season for capturing this breathtaking spectacle is between August and September in the Northern Hemisphere. The Milky Way stands almost vertical in the sky, perfect for compositions that aim to spotlight specific elements against it.
In the Southern Hemisphere,
- From June to August, the Milky Way is diagonal at the beginning of the night, vertical during the middle of the night, and low above the horizon at the end of the night.
- From September to October, the Milky Way is vertical at the beginning of the night and decreases in the sky until reaching a horizontal position.
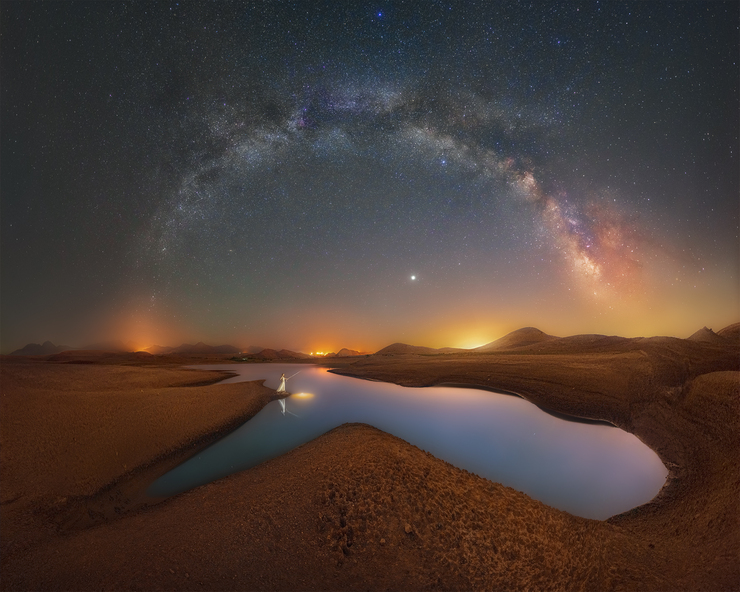
Panorama of the Milky Way (3)

Photo by Carlos González
When the Milky Way is very low in the sky, you have the chance to create great panoramic images, like the one above.
- If you’re shooting in the Northern Hemisphere, in April and May, the galaxy stretches horizontally just above the horizon, creating an ideal backdrop for panoramic shots of the sweeping Milky Way arch.
- In the Southern Hemisphere, the season runs from June to October.
- From June to August, the Milky Way is diagonal at the beginning of the night, vertical during the middle of the night, and low above the horizon at the end of the night.
- From September to October, the Milky Way is vertical at the beginning of the night and decreases in the sky until reaching a horizontal position.
If you're looking for more examples to inspire you, have a look at these Milky Way photos.
And if you don't have enough, check the PhotoPills Awards where dozens of PhotoPillers like you submit their best Milky Way photos every day.
2.Plan your Milky Way photo ideas


If you want to figure out the best time to photograph the Milky Way, you'll have to do a bit of planning.
And using a photography planning app like PhotoPills is crucial :)
What is Milky Way photography planning?
Let's start with the basics.
What's photography planning?
Planning a photo means to find:
- The shooting spot (Red Pin position in the PhotoPills Planner) from where you'll be taking the picture.
- The shooting date when the Milky Way will be in the position you're looking for.
- And the shooting time when the Milky Way will be right where you want it to be in the sky and in your composition.
Why is planning essential when taking a picture of the Milky Way?
Because knowing where and when to go will help you organize your shooting session and nail the shot.
Otherwise, without planning, photographing the Milky Way with a cool foreground, or aligned with a subject you like, is almost impossible.
Planning is a shortcut to get the photos of the Milky Way you want.
Learn to plan any Milky Way picture you imagine
I suggest you try using PhotoPills to plan any photo of the Milky Way that you imagine. It's a very powerful app!
With the following video you'll learn
- How to easily plan the best possible Milky Way photo for a given date with PhotoPills.
- And if you know the photo you want to take but don't know when it happens, you'll learn to determine the exact date and time that the Milky Way will be exactly where you want it to be.
To plan a photo of the Milky Way you have to follow 6 steps:
Place the Red Pin on a potential location.
Set the date of the photo.
Activate the Milky Way layer.
Change the time with the Time bar until the Milky Way is in the position you want.
Move the Red Pin to adjust the shooting spot.
Save the plan using the Save button.
You have a step by step guide in section 7 of our Milky Way photography guide.
Plan your Milky Way picture in the field with the Night AR view
Planning your Milky Way photos ahead of time, comfortably from home, with the PhotoPills Planner is super cool.
But sometimes, when you're in the field, it's more convenient to use the Night Augmented Reality tool to quickly figure out where the Milky Way will be. So you can decide the right shooting spot and the right shooting time to get the best photo possible.
Curious?
Here you have a short video where Rafael explains how to plan a picture of the Milky Way in 1 minute with the Night Augmented Reality view:
Additional Milky Way planning resources
As I said, Milky Way planning is super important, a skill you need to have... because it opens a door to a new universe of creative possibilities.
So, here you have 2 more resources that will help you a lot when planning your photos of the Milky Way:
- How to Plan a Photo of the Milky Way (with Moon).
- How to Plan a Photo of the Winter Milky Way | Step by Step Tutorial.
3.Choose the best lens for shooting the Milky Way

Photo by Roi Levi
"OK Toni, let's get to the point... What's the best lens to capture the Milky Way?"
The best lens is the one you have, the shorter and faster the better...
But...
To nail your Milky Way photos, make sure your lens is:
- Very fast (f number as low as possible).
- Short.
- Not distorting a lot.
- Not vignetting too much.
- Not affected by coma.
After years testing and comparing many camera lenses these are, in my opinion, the best lenses to photograph the Milky Way:
- Nikon AF-S 14-24mm f/2.8G ED (DSLR) and Nikkor Z 14-24mm f/2.8 S (mirrorless).
- Sony FE 24mm f/1.4 GM.
- Canon EF 16-35mm f/2.8L III USM (DSLR) and Canon RF 15-35mm f/2.8 L IS USM (mirrorless).
- Fujifilm XF 18mm f/1.4 R LM WR.
- Sigma 14mm f/1.8 DG HSM Art.
Have a look at what I consider the best lens for shooting the Milky Way.
4.Choose the best camera for Milky Way photography

Photo by Doriano Brunel
To capture the Milky Way in all its luminous detail, ensure your camera:
- Is equipped with a sensor capable of capturing high dynamic range. This means it can handle the extreme contrasts between the darkest and brightest areas of the night sky.
- Minimizes noise, especially at higher ISO settings, which is crucial for clear, crisp night sky images.
- Offers good resolution to ensure that the fine details of the stars and the galaxy are visible.
- Includes some form of stabilization technology to help keep your shots sharp during long exposures.
Through extensive testing and comparison of various camera bodies, here are my top picks for cameras that excel at Milky Way photography:
Have a look at what I consider the best camera for Milky Way photography.
5.Get to your shooting spot in advance
"Toni, how much in advance?"
There's no right answer and it depends on your working methodology.
In my case, I arrive about 2 hours before either the Sunrise or the Sunset starts.
If you're going to a location you don't know to photograph the Milky Way:
- Before Sunrise, you need to scout the location at least 1 or 2 days before as long as it's daylight. Keep in mind that, on the shooting day, you'll get there when it's still dark and it's pitch black.
- After Sunset, try to get there at least 2 or 3 hours in advance to scout the area thoroughly.
Thanks to getting in advance:
- You can work on your composition by paying attention to all the details.
- It allows you to set up your equipment at ease and make sure you don't forget anything.
6.Place the tripod at the shooting spot
As usual, in your PhotoPills plan, the shooting spot is the Red Pin position.
But... How can you know where the exact shooting spot is when you're at the location?
Well, I suggest you follow these strategies:
- Find visual references (e.g. a rock, a house)
- On the map while you're using the PhotoPills Planner at home.
- On the field when, as I always recommend, you're scouting the location before the shooting date.
- Switch on your position (blue dot) on the map.
- First, tap the (+) button on the map.
- Then, tap the eighth button on the toolbar that just showed up (it's the compass icon).
- Finally, zoom in on the map and check that the blue dot is actually aligned with the base of the Red Pin (the exact spot where the stick is pinned).
- Use the AR views available on the Planner.
Once you're sure of your position, place the tripod and the head on a solid surface, press it against the ground and check that it's completely stable.
7.Prepare your gear
Attach the lens to the camera, put the camera on the head and connect the intervalometer.
Yes, I recommend using an external intervalometer. When shooting, the less you touch the camera the better.
The last thing you want is to press the shutter and produce vibrations into the system because vibrations produce blurry images.
You surely want your picture of the Milky Way to be as sharp as possible!
8.Set the shooting mode to Manual (M)
Learning to use Manual shooting mode (M) on your camera lets you control aperture, shutter speed, and ISO for perfect Milky Way shots.
While it might seem easier to use automatic settings, trying Manual mode can sometimes make things easier (particularly to control the shutter speed while using the fastest aperture).
If you prefer semi-auto modes, that's fine too:
- In Aperture Priority (A or Av), you control the depth of field.
- In Shutter Speed Priority (S or Tv), you control motion blur.
Tip: Turn off the long exposure noise reduction option on your camera to save time and shoot faster.
9.Set the shortest focal length you can (<35mm)

Photo by Lukas Vesely
To capture stunning photos of the Milky Way, use a lens with a short focal length, ideally between 14mm and 24mm.
Keeping the focal length below 35mm helps you include more sky in your shot and allows for a large aperture (small f number). This setup lets you use a slower shutter speed, enabling more light to reach the sensor and resulting in brighter stars.
For the best results, focus on lenses in the 14mm to 24mm range.
I'll dive deeper into camera settings, including the shutter speed you need to avoid Star Trails, in section 13 .
If you're still in doubt, go back to section 3 or read more about the best lens for shooting the Milky Way.
10.Set the largest aperture you can
"What aperture should I use for the Milky Way?"
The aperture is a key setting in Milky Way photography.
To capture stunning Milky Way photos, use a lens with the largest aperture possible.
Why?
Shooting at night means your camera has little light to work with. By setting an aperture between f/1.4 and f/2.8, you can maximize light capture. Therefore, the ideal lens for Milky Way photography has an aperture of f/2.8 or larger (lower f number).
But don't worry if you don't have a super-fast lens; you can still take amazing Milky Way shots.
A larger aperture just makes it easier to get those jaw-dropping photos... ;)
11.Focus at the hyperfocal distance
Depending on the scene you're photographing, and what you want to be in focus and out of focus in the photo, you have 3 focusing techniques!
Focus at the hyperfocal distance (the one I usually recommend).
Focus on a star.
Do a focus stacking.
Using one or another will depend on what you want as a photographer and in the scene you're photographing.
Tip: After using the automatic focus mode to focus at the hyperfocal distance, set it back to manual focus. It's the best way to ensure your focus doesn't change.
Have a look at this video where Rafael explains all 3 in full detail and step by step.
Let's have a look at them!
Focus at the hyperfocal distance (my favorite)
Why is it my favorite focusing technique?
Easy...
Focusing your camera at the hyperfocal distance ensures maximum sharpness from half this distance all the way to infinity.
So it's the easiest and fastest way to have everything sharp in your frame.
But what I love most about it is that thanks to PhotoPills I don't have to calculate anything :)


Open PhotoPills and tap on DoF (Pills Menu).
Then, select your camera taping on the top right corner of the screen.
Once you've done it, set focal length and aperture.
The first result you have on the table below the settings is the hyperfocal distance :D
Focus on a star
Follow the steps below:
Set the camera and lens to manual focus.
Set your camera to Live View mode.
Find a star and zoom in on it to magnify it (or use the Focus Magnifier option).
Turn the focus ring to make focus on it. Turn it until you see the star as a tiny little dot (actually, the smallest possible dot).
Once you have set the focus, keep it in manual mode and avoid touching the focus ring while taking your photos, unless you change your lens or focal length.
If you focus on one star you'll be losing a bit of sharpness in your subject.
Do a focus stacking
To do this shooting technique, follow these steps:
Take a shot focusing on the stars.
Take several shots focusing at different distances in the scene to make sure that the whole scene from front to back is tack sharp.
Blend all the photos in Photoshop to get a perfectly sharp image.
If you want to learn how to do focus stacking, I recommend you to watch this amazing masterclass where Isabella Tabacci unveils all her secrets.
12.Frame using the highest ISO available in your camera
Set the ISO to the maximum value.
Then, take as many shots as necessary until you adjust the framing to the composition you're looking for.
Don't be afraid to crank up the ISO.
Yes, I know you'll have noise resulting from using a high ISO in your final image. But who cares? This shot is just a visual sketch.
You want to adjust your composition fast and then keep working. So using the maximum ISO setting possible allows you to use a very fast shutter speed.
The idea here is to avoid wasting time.
13.Adjust the shutter speed using the NPF rule
When taking a picture of the Milky Way, the most important decision is setting the shutter speed.
To keep the lightness of your picture (how light or dark it is), you need to balance the aperture, the shutter speed and the ISO.
In Milky Way photography, 2 conditions define your shutter speed:
- You need to keep the shutter open as much as possible to capture as much light as possible, and thus get more stars in the photo.
- You need to limit the exposure time to prevent stars from trailing, and thus get the stars as big bright spots.
Depending on the camera and settings you use, you should use a maximum shutter speed between 8-20s.
But it's best to calculate it accurately.
To work out the shutter speed for Milky Way you need, use the PhotoPills Spot Stars calculator.


To do so, go to PhotoPills and open the Spot stars calculator.
Once there, choose your camera and set
- The focal length.
- The aperture.
- The minimum declination of the stars (if you don't know, set it to 0º).
- The accuracy mode (default is the best option in most cases).
On the table of results you get two values: the NPF rule and the 500 rule.
Always use the value according to the NPF rule. It's much more accurate.
If you want to learn more about the NPF rule and the 500 rule, you should read section 9 of our Milky Way photography guide.
14.Fine tune the ISO
Ideally, you should use an ISO as low as possible.
However, you've set the aperture (section 10) and the shutter speed (section 13).
So to keep the photo's lightness, the ISO will be set by the exposure triangle. Otherwise, it will be either too dark or too bright.
Therefore, you may be forced to push the ISO up depending on the light conditions (Moon, light pollution, etc.) you have at the time of the photo.
Start with ISO 3200, take as many test shots as necessary (always checking the histogram) and increase it if necessary.
I recommend you keep it between 3200 and 6400. But, as always, it all depends on how much noise your camera produces.
If you need help, I suggest you read a full guide about the best camera for Milky Way photography.
15.Set the white balance to 3900K
To choose the right white balance for night skies, first understand your light sources and their color temperatures, typically measured in Kelvin.
In the case of Milky Way photography, 3900K can make the Milky Way and stars pop.
With that setting you can see the Milky Way colors jump right out at you, and the green airglow becomes much more noticeable.
However, don't take this number for granted. Experiment with this setting to see which one captures the mood you want.
But the best piece of advice I can give you is to always shoot in RAW. That way you can adjust white balance during post-processing.
16.Take a test shot, check the histogram

Photo by John Paraskevas
Now it's time to take a test shot.
Check the histogram, and adjust the settings if needed to get a correct exposure.
When shooting at night, especially for Milky Way photography, focus on capturing sharp stars and maximizing shadow details. Unlike daylight photography, night shots rarely blow out highlights.
To achieve this, use the expose to the right (or ETTR) technique: shift the histogram to the right.
Night sky photos typically have a histogram mountain on the left, representing the dark sky.
Aim to move this peak about 1/4 to 1/3 from the left side by adjusting exposure, aperture, or ISO. Usually, increasing the ISO is your best bet. This approach ensures well-exposed, detailed astro photos.
17.Look up at the stars!
Taking stunning Milky Way photos with a foreground is easier than you think.
With a bit of time and practice, you can master it. Follow the detailed steps I explained above and use PhotoPills to capture amazing Milky Way pictures.
For inspiration, check out the top Milky Way photographers in the world that we feature every day in our Instagram account.
Their work will guide you to look up at the stars and take amazing photos!
Note: Some links on this page are affiliate links. What does this mean? If you buy/rent using these links you're helping support us and it costs you nothing extra. Thank you for your support.
Get this ebook for free now!